Creating an Image

...as the World Spins Out of Control Nikon D5100, Sigma 17-70mm f/2.8-4, 1.6s, 17mm, f/6.3, ISO 200

…as the World Spins Out of Control
Nikon D5100, Sigma 17-70mm f/2.8-4, 1.6s, 17mm, f/6.3, ISO 200

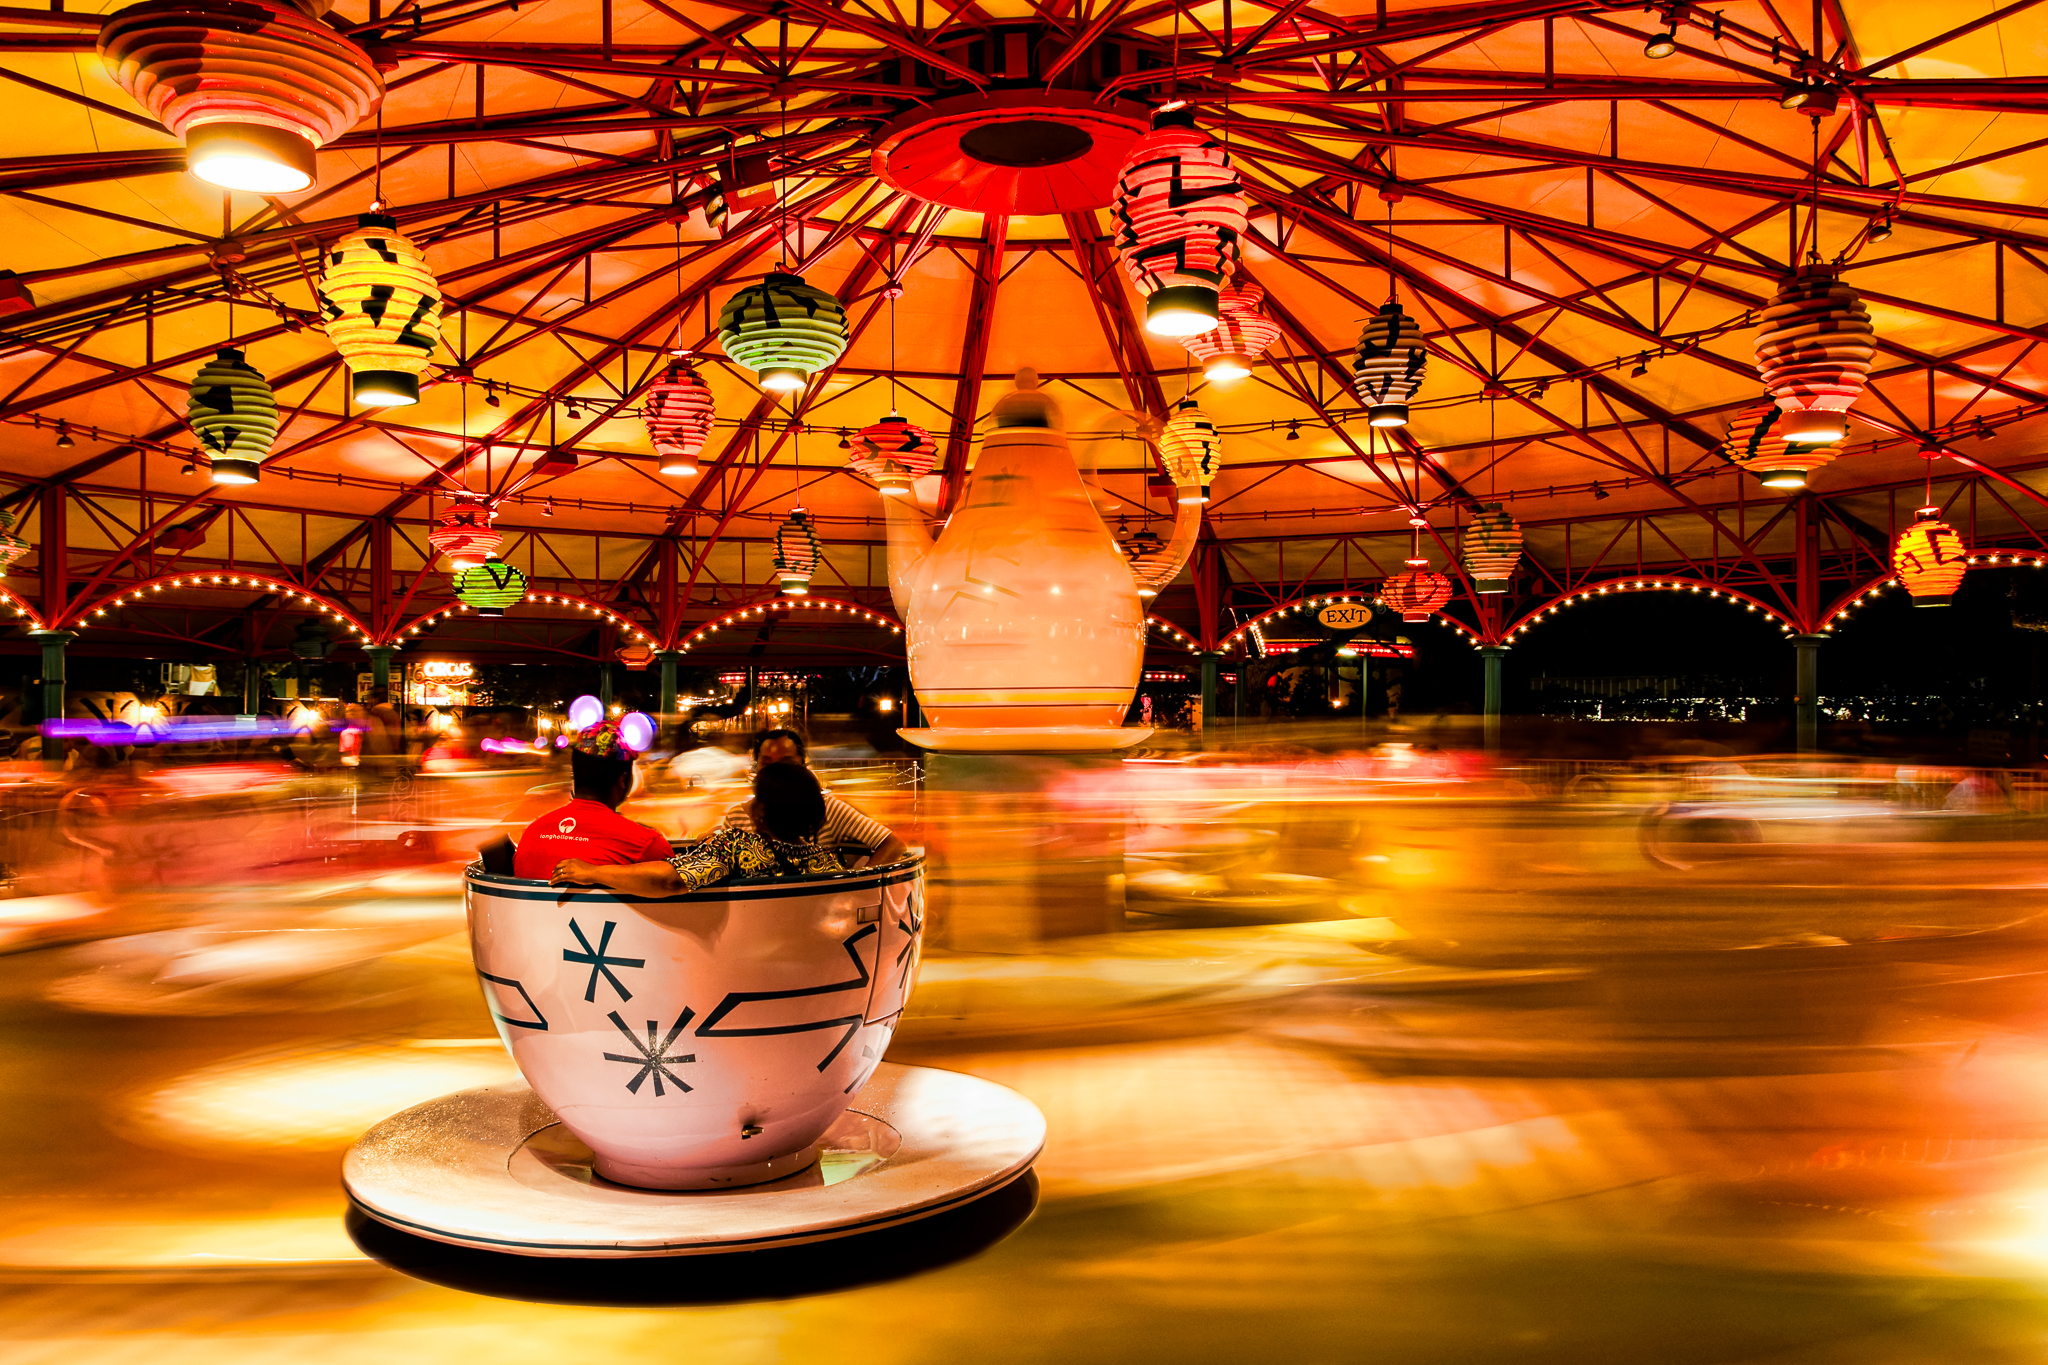
The image above is the result of a happy coincidence as well as an on the spot decision. As most of you who are regular readers know I spent the past week at Walt Disney World for the Photo Magic 2013 event hosted by the Disney Photography Blog. I was between scheduled events one night in the Magic Kingdom and wanted to capture an image of the Mad Tea Party attraction with the ride in motion. I love the effect of moving water and thought the blurred look as the ride was in motion would create a similar effect. The colors at night are also very vibrant on this attraction and I was hoping I could capture that as well in the motion blur.

I picked my spot just outside the fence and was getting the camera ready when a thought struck me. It all came at once and I am sure it was a result of the scene in front of me. There was a tea cup in the foreground that had the riders facing away from me. I pictured my image of the blurred attraction with this lone tea cup frozen in space. I quickly set my exposure and captured the ride before it started to move. You can see the result in image 1 below.

I left the settings the same as the shutter speed was at 1.6 seconds which knowing the speed of this attraction I was confident it would produce the blur I wanted. I captured several images of the ride as it was in motion to ensure I would have one with the lighting the way I wanted it. The best of these blurred images is image 2 below.

...as the World Spins Out of Control - image 1 Nikon D5100, Sigma 17-70mm f/2.8-4, 1.6s, 17mm, f/6.3, ISO 200

…as the World Spins Out of Control – image 1
Nikon D5100, Sigma 17-70mm f/2.8-4, 1.6s, 17mm, f/6.3, ISO 200

...as the World Spins Out of Control - image 2 Nikon D5100, Sigma 17-70mm f/2.8-4, 1.6s, 17mm, f/6.3, ISO 200

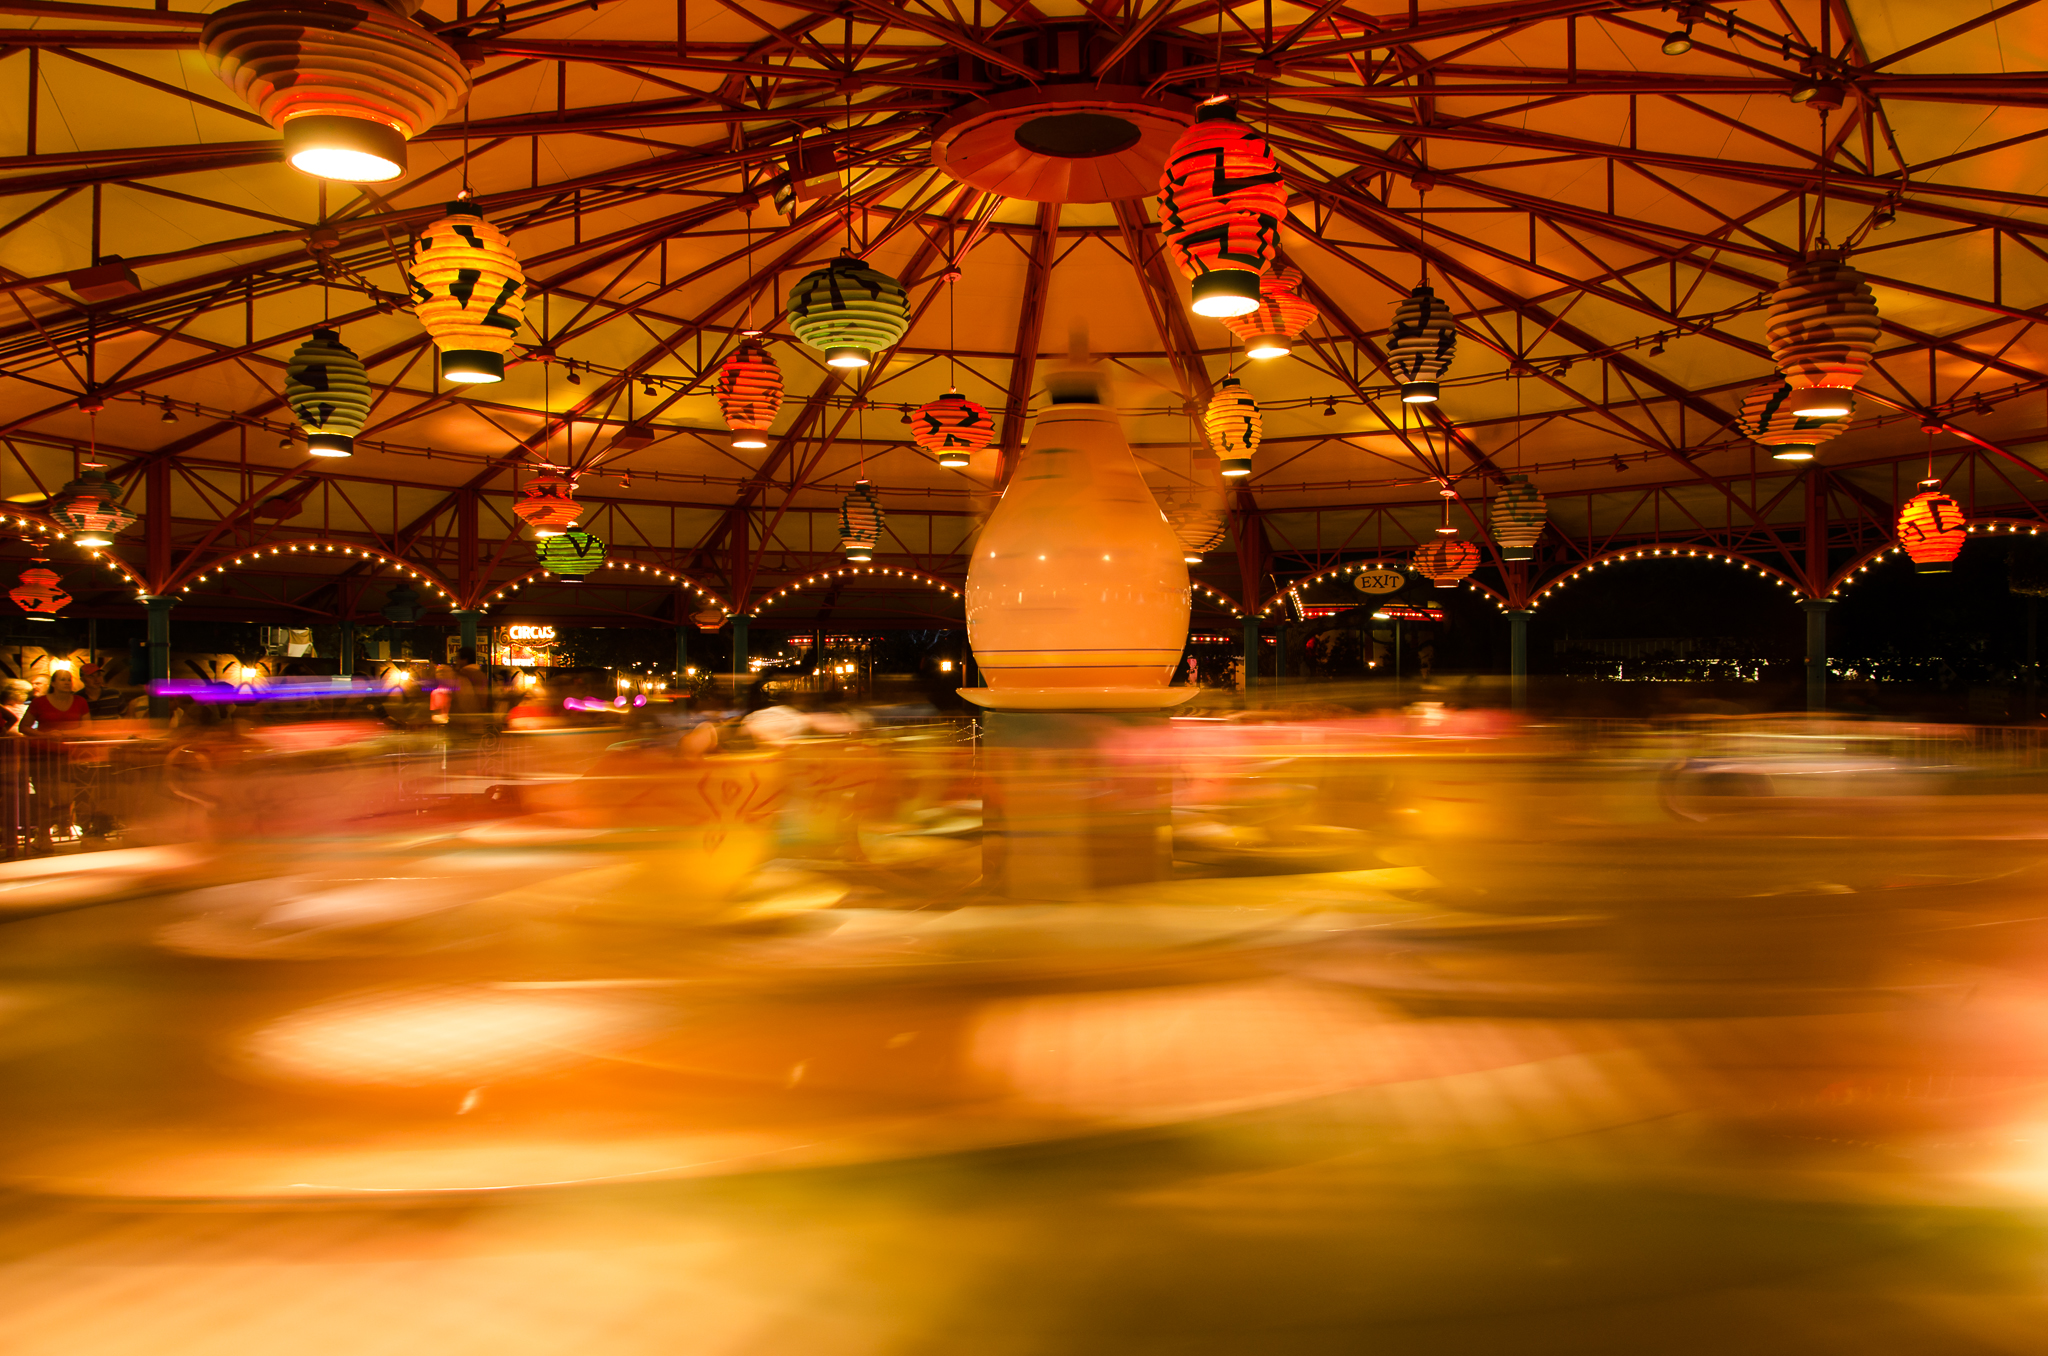
…as the World Spins Out of Control – image 2
Nikon D5100, Sigma 17-70mm f/2.8-4, 1.6s, 17mm, f/6.3, ISO 200

Once I transfered the days images to my computer this was the first image I wanted to work on. Even though I got back to the room late I started assembling this image before getting to sleep. I use Lightroom for most of my image processing and all of my transfer work. I have a few basic development settings applied on import so both images were consistent. For what I wanted to accomplish I needed to bring both into Photoshop Elements. I haven’t found a need to use anything more powerful then Elements for my processing beyond Lightroom. It has been more than capable in letting me create what I envision.

Each photo was brought on to a separate layer in Elements with the blurred image as the background. I applied a layer mask to the image of the stationary tea cups and added a layer mask changed to black which lets all of the layer below show through. It was then just a matter of using a basic brush and painting over the mask with the color white to reveal the portion of the stationary tea cups I wanted. I used an opacity of 100% for all of the interior right up to the edge of the cup and then switched to 25% to fade in the edges to the blurred image background.

All in all I am very happy with the image I was able to create. Surprisingly it is very close to what I envisioned as I stood in front of the attraction that night. I think this is some of what is fun and interesting to me about photography. I love capturing what I see but I also love pushing myself to create something more than what is actually in front of me. Maybe a little of having to create an image is not having all the skills to capture what I want with the camera but images like this could not be captured with a single click of the shutter. In the end, the story in the image is what matters…

Lookout Silhouette

Went out to visit my family this weekend with my daughter. Although it was a long drive we had a great time. The weather didn’t cooperate so I was unable to go exploring with the camera. I had that itch that needed to be scratched so after we returned home today I went for a walk down around the Utica Marsh.

This is a observation/lookout stand supposedly used for viewing the happenings in the marsh. To bad they do not keep the view cleared that looks into the marsh. The only opening lets you look clearly in the wrong direction. I still liked the outline and shadows created by the structure. I tried a little cross processing in an attempt to add a little to the image. Not sure it worked…

Lookout SilhouetteNikon D5100, Sigma 17-70mm f/2.8-4, 1/1600s, 28mm, f/8, ISO 200

Lookout Silhouette
Nikon D5100, Sigma 17-70mm f/2.8-4, 1/1600s, 28mm, f/8, ISO 200

Free is Sometimes Good

I thought maybe today I would try something a little different. Well, at least a little different for me. I’m finding it more difficult each day to get out and explore with the camera. The hope for cooperating weekends don’t always work out so today I’m posting some information about image processing.

When I started this journey into photography I was as green as could be. My extent of photographic ability amounted to transferring the pictures from the camera to my computer and throwing away the ones that didn’t make the cut. I used Google Picasa to organize the images and do minor adjustments like cropping or rotating. The first piece of software I trialed was Lightroom. I eventually purchased a full version and have been using it as my main processing tool for over a year

The second piece of software I started using was Photoshop Elements. My daughter had a copy with the tablet she received for Christmas one year and after struggling with version 7 I decided to buy myself the latest version which was 10. I’m getting better at using Elements and find I use it for an image that needs more than a basic manipulation.

And then the most exciting thing happened just about a year ago…

I entered my name in a contest offered by one of the photographers on Google+ for a copy of Topaz Labs plugins for Lightroom/Photoshop. Now, I have the most terrible of luck and actually forgot all about the contest until I received an email stating I won a copy of the whole plugin bundle. It really changed the way I work on my images. Of course, at first I went overboard and was doing too much processing. Eventually I learned when and how to use all the tools to create the images I wanted. Sometimes I want a natural looking image and sometimes I want to create something more than just a picture.

I recently downloaded onOne Software’s Perfect Effects 4 Free. Which is a completely free fully functioning version of their software but with only a handful of the presets used to manipulate an image. I’m always curious about other options. I am very impressed with this software! With just a few clicks I was able to manipulate an otherwise blah image and pump it up.

The image below is straight out of the camera other than my normal import processing and cropping.

Going to the Birds... (SOOC) Nikon D5100, Sigma 17-70mm f/2.8-4, 1s, 70mm, f/16, ISO 100

Going to the Birds… (SOOC)
Nikon D5100, Sigma 17-70mm f/2.8-4, 1s, 70mm, f/16, ISO 100


In the Perfects Effects software I used two of the included presets; Tonal Contrast and Orton Hears a Who. The software uses layers to allow for staking of the preset effects. Also included are basic manipulation brushes for color, contrast, dodge, burn, etc. There is a masking technology built into the software so it is extremely easy to only affect the area of your image you want to modify.

Going to the Birds... Nikon D5100, Sigma 17-70mm f/2.8-4, 1s, 70mm, f/16, ISO 100

Going to the Birds…
Nikon D5100, Sigma 17-70mm f/2.8-4, 1s, 70mm, f/16, ISO 100


This normally would not have been an image I would have worked on. I wanted to capture the geese on the swamp but I only brought my wide angle zoom and did not have the reach I needed for the image. I loaded this one into the Perfect Effects software just to play around and ended up being pleasantly surprised. It has me looking closer at the onOne software and maybe after the first of the year I’ll get myself a belated Christmas present. 🙂

Calendar Contest Update

I received some good news today via email. One of my pictures entered in the photo contest for the Mohawk Valley 2013 calendar was selected by the readers. The picture below will be for the month of February. The calendar comes out on January 1st in the Observer-Dispatch paper.

This particular image was taken during lunch back on March 1st for an event on Google+. I ended up not using this image for the event and tried some not normal processing on it. I was very happy with the result because I felt it had a post card feel to it and I was able to keep the falling snow visible.

It is not my most favorite image but I thought it represented the Mohawk Valley which is what I thought the intent of the contest was.  Based on the other images in the competition it was more for photographers from the Mohawk Valley.  Anyway, I was happy to have two images selected for the competition and I’m thrilled to have one actually be in the calendar.

Canal Lock 20

Canal Lock 20

‘Tis The Season

Well, it is time to end my recent hiatus, I just wish it could be with a new picture. The weather, shorter daylight hours and quite a bit more activity at work as the year ends has kept me away from my camera. I even tried to enjoy today off from work but the constant drizzle outside and grey, overcast sky has left me with no opportunity to go exploring. To partially remedy this situation and relieve my posting withdrawal symptoms I decided to recycle and old image.

This image is from almost a year ago. I was still using my old point & shoot camera to learn on and was about three weeks into my attempt at a 365 project (that project eventually ended after 91 days, but that is another story). I had just finished hanging the lights on the house and realized I needed a picture for the day. I liked the way “cool blue” lights looked against the surrounding blackness.

As you can see from the original I was still learning my way around Lightroom. The Sony only saved JPEG images but I generally was able to create the image I wanted. I still hadn’t learned about blown highlights or white balance. The changes I made to this image are subtle. I corrected the color of the lights and recovered some detail in the highlights. I applied a little more noise reduction and sharpened the image with the newer techniques I have learned.  Small differences but I do like the new image better.

Xmas Lights Original Sony DSC-H20, 1/20s, 12.7mm, f/4, ISO 200

Xmas Lights Original
Sony DSC-H20, 1/20s, 12.7mm, f/4, ISO 200

Xmas Lights Redo Sony DSC-H20, 1/20s, 12.7mm, f/4, ISO 200

Xmas Lights Redo
Sony DSC-H20, 1/20s, 12.7mm, f/4, ISO 200

Thoughts on a Sunday

If you are a landscape photographer or generally only capture images of landscapes, how far do you go while processing your image? How much do you enhance the image? Do you attempt to create an image that is the best you can make? Or, do you try for as much realism as possible? Is your processing based on the scene or do you have a general ‘look’ to your images?

I was driving home from work the other day and the sun was breaking through a dark cloud cover. I was amazed by the clarity of the sunlight shining through the holes in the clouds. It was a very intense light that was begging me to pick up my camera. I knew in my head what I wanted in the foreground to help create a more interesting image. There was a tree in the field close to home that had the brightest yellow leaves. They would just ‘pop’ out of the picture against the clouds. I couldn’t drive fast enough.

My problem became a race against the wind. The clouds were moving too fast and I was losing my image. When I did arrive at the field I quickly pulled over, grabbed the camera and tried to make a picture as nice as the one I envisioned in my head. It didn’t quite work out as I had hoped. There was a second tree in the field next to my yellowed leaf beauty that was just empty branches. The clouds had already started to fill in the holes and the beams of sunlight were not as intense as I saw when I started this race. I clicked away for a few minutes and then the scene was gone.

The image below is the straight out of camera image…

Shine Down on Me – SOOC
Nikon D5100, Nikkor 55-200mm f/4-5.6, 1/160s, 62mm, f/11, ISO 400


I have stared at the images from that day for a while now. I wasn’t happy with how they turned out and I almost deleted them more than once. I decided I should try to see what I could create and set about processing the best of the group. I know the original thought in my head was to create a ‘landscape’ image which I have always associated with trying to make it look as ‘real’ as it was when the shutter clicked. That just wasn’t happening.

I ended up using Lightroom to do all my basic adjustments. Warm up the image slightly to help bring out the colors. Reduce the noise in the image. Tweak the highlights and shadows. Sharpen the image as I was just slightly out of focus. When I finally had everything set I threw the image in Topaz Labs Adjust and went to the HDR presets. I selected the ‘Dynamic Brightness’ preset and went to work tweaking the settings. The image below is the final result.

Shine Down on Me
Nikon D5100, Nikkor 55-200mm f/4-5.6, 1/160s, 62mm, f/11, ISO 400


You can definitely see the beams of sunlight and the autumn colors look good against the dark clouds but the image looks unreal to me. It is somewhat close to the image I had in my head when I first caught sight of the sky but it is far from what was really before me when I captured the scene. Now don’t get me wrong, I use all the tools at my disposal while processing my images. I’m not sure what my issue is with this particular image but if feels fake to me. I think I ‘pushed’ it too far while processing in my attempt to highlight the beams of sunlight. I know I have created other images that are far removed from reality so I’m struggling with what it is about this image that bothers me.

I would definitely be interested in any thoughts on this image or processing in general. Thanks…